
Introduction to Network Simulator 2 | NS2 Tutorial 1

Introduction to Network Simulator 2

NS2 stands for Network Simulator Version 2. It is an open-source event-driven simulator designed specifically for research in computer communication networks.

Network Simulator (Version 2), is simply an event-driven simulation tool that has proved useful in studying the dynamic nature of communication networks. Simulation of wired as well as wireless network functions and protocols (e.g., routing algorithms, TCP, UDP) can be done using NS2. In general, NS2 provides users with a way of specifying such network protocols and simulating their corresponding behaviors. Due to its flexibility and modular nature, NS2 has gained constant popularity in the networking research community since its birth in 1989. Ever since, several revolutions and revisions have marked the growing maturity of the tool, thanks to substantial contributions from the players in the field. Among these are the University of California and Cornell University which developed the REAL network simulator,  the foundation on which NS is based. Since 1995 the Defense Advanced Research Projects Agency (DARPA) supported the development of NS through the Virtual Inter Network Testbed (VINT) project. Currently, the National Science Foundation (NSF) has joined the ride in development. Last but not least, the group of Researchers and developers in the community are constantly working to keep NS2 strong and versatile


Features of NS2

1. It is a discrete event simulator for networking research.

2. It provides substantial support to simulate a bunch of protocols like TCP, FTP, UDP, HTTP, and DSR.

3. It is primarily Unix-based.

4. Uses TCL as its scripting language.

5. Otcl: Object-oriented support

 6. Tclcl: C++ and otcl linkage

7.  Discrete event scheduler
The basic

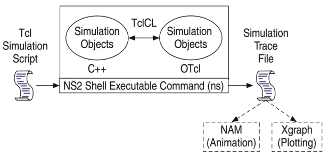
The basic architecture of NS2


Figure shows the basic architecture of NS2. The NS2 provides users with executable command ns which takes on input argument, the name of a Tcl simulation scripting file. Users are feeding the name of a Tcl simulation script (which sets up a simulation) as an input argument of an NS2 executable command ns.

In most cases, a simulation trace file is created and is used to plot graphs and/or to create animation. NS2 consists of two key languages: C++ and Object-oriented Tool Command Language (OTcl). While C++ defines the internal mechanism (i.e., a backend) of the simulation objects, the OTcl sets up the simulation by assembling and configuring the objects as well as scheduling discrete events (i.e., a frontend).


The C++ and the OTcl are linked together using TclCL. Mapped to a C++ object, variables in the OTcl domains are sometimes referred to as handles. Conceptually, a handle (e.g., n as a Node handle) is just a string (e.g.,_o10) in the OTcl domain, and does not contain any functionality. Instead, the functionality (e.g., receiving a packet) is defined in th mapped C++ object (e.g., of class Connector). In the OTcl domain, a handle acts as a frontend that interacts with users and other OTcl objects.


Comments

Popular posts from this blog

How to Create Ubuntu 24.04 Bootable USB Using Rufus [Step-by-Step Guide]

How to Create Ubuntu 24.04 Bootable USB Using Rufus [Step-by-Step Guide] Are you planning to install or try Ubuntu 24.04 LTS ? The easiest and most reliable method is to create a bootable USB drive using Rufus on a Windows system. This detailed guide will help you create a Ubuntu 24.04 USB bootloader using Rufus with easy-to-follow steps and screenshots (optional). Here is the complete video of the bootloader creation and OS installation in Windows 11. 🧰 Requirements A USB flash drive (minimum 8GB recommended) A Windows PC Ubuntu 24.04 LTS ISO file Rufus USB creation tool 🧾 Steps to Create a Ubuntu 24.04 Bootable USB Using Rufus ✅ Step 1: Download Ubuntu 24.04 ISO Visit the official Ubuntu website and download the Ubuntu 24.04 LTS ISO file . ✅ Step 2: Download and Run Rufus Head to Rufus official site and download the latest version. Open the executable file (no installation required). ✅ Step 3: Insert USB Drive Plug in your USB drive. Rufus ...

Installing ns3 in Ubuntu 22.04 | Complete Instructions

In this post, we are going to see how to install ns-3.36.1 in Ubuntu 22.04. You can follow the video for complete details Tools used in this simulation: NS3 version ns-3.36.1  OS Used: Ubuntu 22.04 LTS Installation of NS3 (ns-3.36.1) There are some changes in the ns3 installation procedure and the dependencies. So open a terminal and issue the following commands Step 1:  Prerequisites $ sudo apt update In the following packages, all the required dependencies are taken care and you can install all these packages for the complete use of ns3. $ sudo apt install g++ python3 python3-dev pkg-config sqlite3 cmake python3-setuptools git qtbase5-dev qtchooser qt5-qmake qtbase5-dev-tools gir1.2-goocanvas-2.0 python3-gi python3-gi-cairo python3-pygraphviz gir1.2-gtk-3.0 ipython3 openmpi-bin openmpi-common openmpi-doc libopenmpi-dev autoconf cvs bzr unrar gsl-bin libgsl-dev libgslcblas0 wireshark tcpdump sqlite sqlite3 libsqlite3-dev  libxml2 libxml2-dev libc6-dev libc6-dev-i386 libc...

NS2 (NS-2.35) Installation in Ubuntu 11.10

This post will help you in installing Network Simulator 2 version NS2.35 in Ubuntu 11.10 Instructions Install Ubuntu Download NS-2.35 ( http://sourceforge.net/projects/nsnam/files/allinone/ns-allinone-2.35/ns-allinone-2.35.tar.gz/download ) Unzip or untar it to any folder (recommended is /home/ loginname) using the following commands one by one sudo apt-get update sudo apt-get install build-essential autoconf automake libxmu-dev tar zxvf ns-allinone-2.35.tar.gz cd ns-allinone-2.35 ./install Once installed the PATH information will be provided to you. Copy the PATH and LD_LIBRARY_PATH Variable to .bashrc (see a dot in the beginning) Input the path information in .bashrc file like this export PATH=$PATH:<Place your paths here> export LD_LIBRARY_PATH=$LD_LIBRARY_PATH: <place the LD_LIBRARY_PATHS> here. Once done, save the file and close execute the command source .bashrc try ns or nam to see whether your installation succeeded.