VPL Jail Server Installation | Virtual Programming Laboratory with Moodle

Virtual Programming Laboratory (VPL) 

This post tells you how to install VPL Jail Server Installation in Ubuntu 20.04 and how to configure it using Moodle Learning Management System.

VPL - Virtual Programming Laboratory 

For full installation with complete description, follow the video


What is VPL?
VPL is Virtual Programming Laboratory which is a tool for programming assignments, evaluation and running of programs. The programming languages supported by VPL is C, C++, Java, Python, Perl, PHP, NodeJS, Verilog, etc.

Step 1 - Install 
VPN Jail Server Installation 
  • My Server configuration 
  • 16GB RAM and 16 Core PRocessor (Intel Xeon) 
  • Virtual Machine 
  • Ubuntu 20.04 (64 bit OS).
To download the softwares 
https://vpl.dis.ulpgc.es/index.php/home/download 

Unzip or untar the above file in the home folder (in my case it is /home/tspradeepkumar/)

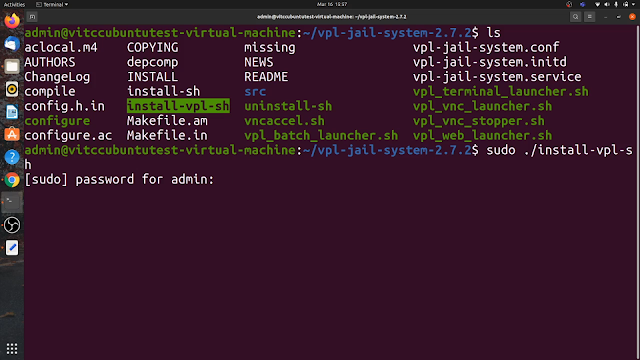
$ cd vpl-jail-system-2.7.2/
$ sudo ./install-vpl-sh

VPL Jail Server Installation

This will take some time based on your internet connection:

To Start the VPL Jail Server, use the following command

$ systemctl start vpl-jail-system

To stop it 

$ systemctl stop vpl-jail-system

To know the status of the system

$ systemctl status vpl-jail-system

Also open the browser and check the URL 

http://172.16.0.91/OK (Upper Case OK)

VPL Jail Server Installation


You should get a OK indicates that the VPL Jail Server is installed Successfully. 

There is a separate configuration for https, you can follow it while installing the VPL jail System.

Step 2 - Moodle plugin for VPL software.

Now, how do we enable the plugin in Moodle 

Download the plugin from the site

https://moodle.org/plugins/download.php/24287/mod_vpl_moodle311_2021052513.zip

Copy it to the moodle module folder 

moodle/mod/

Comments

Popular posts from this blog

Installing ns3 in Ubuntu 22.04 | Complete Instructions

In this post, we are going to see how to install ns-3.36.1 in Ubuntu 22.04. You can follow the video for complete details Tools used in this simulation: NS3 version ns-3.36.1  OS Used: Ubuntu 22.04 LTS Installation of NS3 (ns-3.36.1) There are some changes in the ns3 installation procedure and the dependencies. So open a terminal and issue the following commands Step 1:  Prerequisites $ sudo apt update In the following packages, all the required dependencies are taken care and you can install all these packages for the complete use of ns3. $ sudo apt install g++ python3 python3-dev pkg-config sqlite3 cmake python3-setuptools git qtbase5-dev qtchooser qt5-qmake qtbase5-dev-tools gir1.2-goocanvas-2.0 python3-gi python3-gi-cairo python3-pygraphviz gir1.2-gtk-3.0 ipython3 openmpi-bin openmpi-common openmpi-doc libopenmpi-dev autoconf cvs bzr unrar gsl-bin libgsl-dev libgslcblas0 wireshark tcpdump sqlite sqlite3 libsqlite3-dev  libxml2 libxml2-dev libc6-dev libc6-dev-i386 libc...

Installation of NS2 (ns-2.35) in Ubuntu 20.04

Installation of NS2 (ns-2.35) in Ubuntu 20.04 LTS Step 1: Install the basic libraries like      $] sudo apt install build-essential autoconf automake libxmu-dev Step 2: install gcc-4.8 and g++-4.8 open the file using sudo mode $] sudo nano /etc/apt/sources.list Include the following line deb http://in.archive.ubuntu.com/ubuntu bionic main universe $] sudo apt update $] sudo apt install gcc-4.8 g++-4.8 Step 3:  Unzip the ns2 packages to home folder $] tar zxvf ns-allinone-2.35.tar.gz $] cd ns-allinone-2.35/ns-2.35 Modify the following make files. ~ns-2.35/Makefile.in Change @CC@ to gcc-4.8 change @CXX@ to g++-4.8 ~nam-1.15/Makefile.in ~xgraph-12.2/Makefile.in ~otcl-1.14/Makefile.in Change in all places  @CC@ to gcc-4.8 @CPP@ or @CXX@ to g++-4.8 open the file: ~ns-2.35/linkstate/ls.h Change at the Line no 137  void eraseAll() { erase(baseMap::begin(), baseMap::end()); } to This void eraseAll() { this->erase(baseMap::begin(), baseMap::end()); } All changes ...

Simulation of URDF, Gazebo and Rviz | ROS Noetic Tutorial 8

Design a User-defined robot of your choice (or you can use the URDF file) and enable the LIDAR Scanner so that any obstacle placed on the path of the light scan will cut the light rays. Visualize the robot in the Gazebo workspace, and also show the demonstration in RViz.   (NB: Gain knowledge on wiring URDF file and .launch file for enabling any user-defined robot to get launched in the gazebo platform.) SLAM : One of the most popular applications of ROS is SLAM(Simultaneous Localization and Mapping). The objective of the SLAM in mobile robotics is to construct and update the map of an unexplored environment with the help of the available sensors attached to the robot which will be used for exploring. URDF: Unified Robotics Description Format, URDF, is an XML specification used in academia and industry to model multibody systems such as robotic manipulator arms for manufacturing assembly lines and animatronic robots for amusement parks. URDF is especially popular with users of the ...