Link state routing in ns3
There are two varieties of protocols that deals with wired networks namely distance vector routing and link state routing,
As per the wikipedia, Distance-vector routing protocols, which work by having each node share its routing table with its neighbours, in a link-state protocol the only information passed between nodes is connectivity related. Link-state algorithms are sometimes characterized informally as each router, "telling the world about its neighbors.
This exercise can be one of the lab exercises of many universities in India. There are many more exercises to follow. If one understand this video, they can able to simulate any network design and run it successfully in ns3.
In this blog post, I am not going to explain the concepts of link state routing, but will explain how to configure the nodes to use link state routing in ns3.
Please find the video for the source code explanation and compilation in ns3 on link state routing protocol
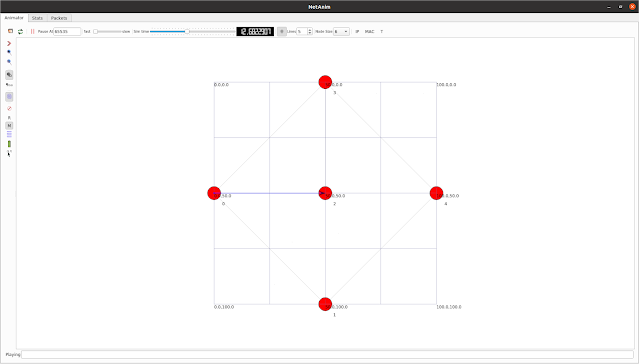
Scenario is
Here is the source code from GITHUB https://github.com/tspradeepkumar/ns3
else you can copy from here:
//Link state routing for Wired Networks, OLSR
#include <iostream>
#include <fstream>
#include <string>
#include <cassert>
#include "ns3/core-module.h"
#include "ns3/network-module.h"
#include "ns3/internet-module.h"
#include "ns3/point-to-point-module.h"
#include "ns3/applications-module.h"
#include "ns3/olsr-helper.h"
#include "ns3/ipv4-static-routing-helper.h"
#include "ns3/ipv4-list-routing-helper.h"
#include "ns3/netanim-module.h"
using namespace ns3;
NS_LOG_COMPONENT_DEFINE ("SimplePointToPointOlsrExample");
int
main (int argc, char *argv[])
{
Config::SetDefault ("ns3::OnOffApplication::PacketSize", UintegerValue (210));
Config::SetDefault ("ns3::OnOffApplication::DataRate", StringValue ("448kb/s"));
CommandLine cmd;
cmd.Parse (argc, argv);
NS_LOG_INFO ("Create nodes.");
NodeContainer c;
c.Create (5);
NodeContainer n01 = NodeContainer (c.Get (0), c.Get (1));
NodeContainer n14 = NodeContainer (c.Get (1), c.Get (4));
NodeContainer n43 = NodeContainer (c.Get (4), c.Get (3));
NodeContainer n30 = NodeContainer (c.Get (3), c.Get (0));
NodeContainer n02 = NodeContainer (c.Get (0), c.Get (2));
NodeContainer n23 = NodeContainer (c.Get (2), c.Get (3));
// Enable OLSR
NS_LOG_INFO ("Enabling OLSR Routing.");
OlsrHelper olsr;
Ipv4StaticRoutingHelper staticRouting;
Ipv4ListRoutingHelper list;
list.Add (staticRouting, 0);
list.Add (olsr, 10);
InternetStackHelper internet;
internet.SetRoutingHelper (list); // has effect on the next Install ()
internet.Install (c);
// We create the channels first without any IP addressing information
NS_LOG_INFO ("Create channels.");
PointToPointHelper p2p;
p2p.SetDeviceAttribute ("DataRate", StringValue ("10Mbps"));
p2p.SetChannelAttribute ("Delay", StringValue ("2ms"));
NetDeviceContainer nd01 = p2p.Install (n01);
p2p.SetDeviceAttribute ("DataRate", StringValue ("5Mbps"));
p2p.SetChannelAttribute ("Delay", StringValue ("10ms"));
NetDeviceContainer nd14 = p2p.Install (n14);
p2p.SetDeviceAttribute ("DataRate", StringValue ("50Mbps"));
p2p.SetChannelAttribute ("Delay", StringValue ("50ms"));
NetDeviceContainer nd43 = p2p.Install (n43);
p2p.SetDeviceAttribute ("DataRate", StringValue ("5Mbps"));
p2p.SetChannelAttribute ("Delay", StringValue ("5ms"));
NetDeviceContainer nd30 = p2p.Install (n30);
p2p.SetDeviceAttribute ("DataRate", StringValue ("1Mbps"));
p2p.SetChannelAttribute ("Delay", StringValue ("1ms"));
NetDeviceContainer nd02 = p2p.Install (n02);
p2p.SetDeviceAttribute ("DataRate", StringValue ("2Mbps"));
p2p.SetChannelAttribute ("Delay", StringValue ("2ms"));
NetDeviceContainer nd23 = p2p.Install (n23);
// Later, we add IP addresses.
NS_LOG_INFO ("Assign IP Addresses.");
Ipv4AddressHelper ipv4;
ipv4.SetBase ("10.1.1.0", "255.255.255.0");
Ipv4InterfaceContainer i01 = ipv4.Assign (nd01);
ipv4.SetBase ("10.1.2.0", "255.255.255.0");
Ipv4InterfaceContainer i14 = ipv4.Assign (nd14);
ipv4.SetBase ("10.1.3.0", "255.255.255.0");
Ipv4InterfaceContainer i43 = ipv4.Assign (nd43);
ipv4.SetBase ("10.1.4.0", "255.255.255.0");
Ipv4InterfaceContainer i30 = ipv4.Assign (nd30);
ipv4.SetBase ("10.1.5.0", "255.255.255.0");
Ipv4InterfaceContainer i02 = ipv4.Assign (nd02);
ipv4.SetBase ("10.1.6.0", "255.255.255.0");
Ipv4InterfaceContainer i23 = ipv4.Assign (nd23);
// Create the OnOff application to send UDP datagrams of size
// 210 bytes at a rate of 448 Kb/s
NS_LOG_INFO ("Create Applications.");
uint16_t port = 8000; // Discard port (RFC 863)
OnOffHelper onoff1 ("ns3::UdpSocketFactory",
InetSocketAddress (i02.GetAddress (1), port));
onoff1.SetConstantRate (DataRate ("448kb/s"));
ApplicationContainer onOffApp1 = onoff1.Install (c.Get (1));
onOffApp1.Start (Seconds (10.0));
onOffApp1.Stop (Seconds (20.0));
// Create packet sinks to receive these packets
PacketSinkHelper sink ("ns3::UdpSocketFactory",
InetSocketAddress (Ipv4Address::GetAny (), port));
NodeContainer sinks = NodeContainer (c.Get (2), c.Get (1));
ApplicationContainer sinkApps = sink.Install (sinks);
sinkApps.Start (Seconds (0.0));
sinkApps.Stop (Seconds (21.0));
AsciiTraceHelper ascii;
p2p.EnableAsciiAll (ascii.CreateFileStream ("lsr.tr"));
p2p.EnablePcapAll ("lsr");
AnimationInterface anim("lsr.xml");
anim.SetConstantPosition(c.Get(0),0.0,50.0);
anim.SetConstantPosition(c.Get(1),50.0,100.0);
anim.SetConstantPosition(c.Get(2),50.0,50.0);
anim.SetConstantPosition(c.Get(3),50.0,0.0);
anim.SetConstantPosition(c.Get(4),100.0,50.0);
Simulator::Stop (Seconds (30));
NS_LOG_INFO ("Run Simulation.");
Simulator::Run ();
Simulator::Destroy ();
NS_LOG_INFO ("Done.");
return 0;
}
How to Run this file in ns3
This file LinkStateRouting.cc have to be stored in ns-3.29/scratch folder
open a terminal
$ cd ns-allinone-3.29/ns-3.29/
$ ./waf --run scratch/LinkStaterouting
To run network animation
Open a new terminal
$] cd ns-allinone-3.29/netanim-3.108/
$] ./NetAnim
The output is shown like this
Tracemetrics
Open a new Terminal
$] cd tracemetrics-1.4.0/
$] java -jar tracemetrics.jar


Comments
Post a Comment