
PyTorch Code for Simple Neural Networks for MNIST Dataset

Xgraph

Xgraph is an X-Windows application that includes:

  • interactive plotting and graphing
  • animation and deritives
  • portability and bug fixes

So to plot the characteristics of NS2 parameters like throughput, end to end delay, packets information, etc can be plotted using xgraph
The successful installation of NS2 will install xgraph also along with it.
To run xgraph from a shell prompt: # xgraph filename.xg

inside TCL scripts, xgraph can be written like this
exec xgraph filename.xg -geometry 500×500
if there are more xgraph files then,
exec xgraph filename1.xg -geometry 500×500 &
exec xgraph filename2.xg -geometry 500×500 &
The ambersand is mandatory to popup all the graph windows, if & (ambersand) is not there, then only the last xgraph window will be popped up.

Sample xgraph file and its contents
/*** The xgraph file shows the information about the overhead with size of the network,
Overhead is compared with four routing protocols like AODV, DSR, DSDV and NEAODV (my own algorithm)
the values are taken from various trace files.
To execute the following xgraph file, copy the following contents and save it as “example.xg” possibly (other formats also supported) and in the shell prompt # xgraph example.xg
TitleText: Overhead (Kbits/s) Vs Network Size
YUnitText: OverHead
XUnitText: Network Size (nodes)
“NEAODV”
200 100
400 350
600 800
800 1200

“AODV”
200 500
400 1600
600 2300
800 3700

“DSR”
200 100
400 320
600 400
800 600

“DSDV”
200 500
400 3700
600 6400
800 11600
Output window will be looking like this

Comments

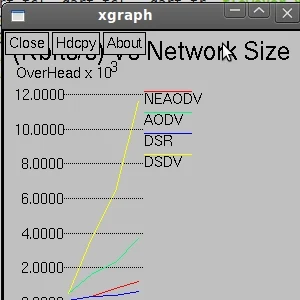
  1. Is xgraph available in ns3? Pls how do i use xgraph in ns3. Ogunsakinor@gmail.com

    ReplyDelete
  2. thx for this post , i ask you kindly how can i extract this values
    (x,y) coordinates from my tracefile ? is there some commande to write in my tracefile ? or how ?

    thanks in advance

    ReplyDelete

Post a Comment

Popular posts from this blog

Installing ns3 in Ubuntu 22.04 | Complete Instructions

In this post, we are going to see how to install ns-3.36.1 in Ubuntu 22.04. You can follow the video for complete details Tools used in this simulation: NS3 version ns-3.36.1  OS Used: Ubuntu 22.04 LTS Installation of NS3 (ns-3.36.1) There are some changes in the ns3 installation procedure and the dependencies. So open a terminal and issue the following commands Step 1:  Prerequisites $ sudo apt update In the following packages, all the required dependencies are taken care and you can install all these packages for the complete use of ns3. $ sudo apt install g++ python3 python3-dev pkg-config sqlite3 cmake python3-setuptools git qtbase5-dev qtchooser qt5-qmake qtbase5-dev-tools gir1.2-goocanvas-2.0 python3-gi python3-gi-cairo python3-pygraphviz gir1.2-gtk-3.0 ipython3 openmpi-bin openmpi-common openmpi-doc libopenmpi-dev autoconf cvs bzr unrar gsl-bin libgsl-dev libgslcblas0 wireshark tcpdump sqlite sqlite3 libsqlite3-dev  libxml2 libxml2-dev libc6-dev libc6-dev-i386 libclang-dev llvm-

Installation of NS2 (ns-2.35) in Ubuntu 20.04

Installation of NS2 (ns-2.35) in Ubuntu 20.04 LTS Step 1: Install the basic libraries like      $] sudo apt install build-essential autoconf automake libxmu-dev Step 2: install gcc-4.8 and g++-4.8 open the file using sudo mode $] sudo nano /etc/apt/sources.list Include the following line deb http://in.archive.ubuntu.com/ubuntu bionic main universe $] sudo apt update $] sudo apt install gcc-4.8 g++-4.8 Step 3:  Unzip the ns2 packages to home folder $] tar zxvf ns-allinone-2.35.tar.gz $] cd ns-allinone-2.35/ns-2.35 Modify the following make files. ~ns-2.35/Makefile.in Change @CC@ to gcc-4.8 change @CXX@ to g++-4.8 ~nam-1.15/Makefile.in ~xgraph-12.2/Makefile.in ~otcl-1.14/Makefile.in Change in all places  @CC@ to gcc-4.8 @CPP@ or @CXX@ to g++-4.8 open the file: ~ns-2.35/linkstate/ls.h Change at the Line no 137  void eraseAll() { erase(baseMap::begin(), baseMap::end()); } to This void eraseAll() { this->erase(baseMap::begin(), baseMap::end()); } All changes made Step 4: Open a new termi

Installation of NS2 in Ubuntu 22.04 | NS2 Tutorial 2

NS-2.35 installation in Ubuntu 22.04 This post shows how to install ns-2.35 in Ubuntu 22.04 Operating System Since ns-2.35 is too old, it needs the following packages gcc-4.8 g++-4.8 gawk and some more libraries Follow the video for more instructions So, here are the steps to install this software: To download and extract the ns2 software Download the software from the following link http://sourceforge.net/projects/nsnam/files/allinone/ns-allinone-2.35/ns-allinone-2.35.tar.gz/download Extract it to home folder and in my case its /home/pradeepkumar (I recommend to install it under your home folder) $ tar zxvf ns-allinone-2.35.tar.gz or Right click over the file and click extract here and select the home folder. $ sudo apt update $ sudo apt install build-essential autoconf automake libxmu-dev gawk To install gcc-4.8 and g++-4.8 $ sudo gedit /etc/apt/sources.list make an entry in the above file deb http://in.archive.ubuntu.com/ubuntu/ bionic main universe $ sudo apt update Since, it&#