Xgraph is an X-Windows application that includes:
The successful installation of NS2 will install xgraph also along with it.
To run xgraph from a shell prompt: # xgraph filename.xg
inside TCL scripts, xgraph can be written like this
exec xgraph filename.xg -geometry 500x500
if there are more xgraph files then,
exec xgraph filename1.xg -geometry 500x500 &
exec xgraph filename2.xg -geometry 500x500 &
The ambersand is mandatory to popup all the graph windows, if & (ambersand) is not there, then only the last xgraph window will be popped up.
Sample xgraph file and its contents
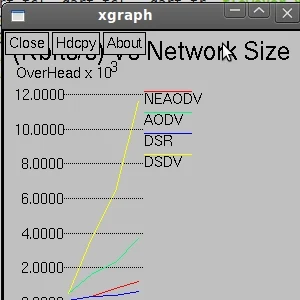
/*** The xgraph file shows the information about the overhead with size of the network,
Overhead is compared with four routing protocols like AODV, DSR, DSDV and NEAODV (my own algorithm)
the values are taken from various trace files.
To execute the following xgraph file, copy the following contents and save it as "example.xg" possibly (other formats also supported) and in the shell prompt # xgraph example.xg
TitleText: Overhead (Kbits/s) Vs Network Size
YUnitText: OverHead
XUnitText: Network Size (nodes)
"NEAODV"
200 100
400 350
600 800
800 1200
"AODV"
200 500
400 1600
600 2300
800 3700
"DSR"
200 100
400 320
600 400
800 600
"DSDV"
200 500
400 3700
600 6400
800 11600
Output window will be looking like this

- interactive plotting and graphing
- animation and deritives
- portability and bug fixes
The successful installation of NS2 will install xgraph also along with it.
To run xgraph from a shell prompt: # xgraph filename.xg
inside TCL scripts, xgraph can be written like this
exec xgraph filename.xg -geometry 500x500
if there are more xgraph files then,
exec xgraph filename1.xg -geometry 500x500 &
exec xgraph filename2.xg -geometry 500x500 &
The ambersand is mandatory to popup all the graph windows, if & (ambersand) is not there, then only the last xgraph window will be popped up.
Sample xgraph file and its contents
/*** The xgraph file shows the information about the overhead with size of the network,
Overhead is compared with four routing protocols like AODV, DSR, DSDV and NEAODV (my own algorithm)
the values are taken from various trace files.
To execute the following xgraph file, copy the following contents and save it as "example.xg" possibly (other formats also supported) and in the shell prompt # xgraph example.xg
TitleText: Overhead (Kbits/s) Vs Network Size
YUnitText: OverHead
XUnitText: Network Size (nodes)
"NEAODV"
200 100
400 350
600 800
800 1200
"AODV"
200 500
400 1600
600 2300
800 3700
"DSR"
200 100
400 320
600 400
800 600
"DSDV"
200 500
400 3700
600 6400
800 11600
Output window will be looking like this

hello
ReplyDeletehello
ReplyDeleteI am doing project in ns2 for wireless sensor network. it is very new to me... i have done some code and got output in nam . i want to get a Xgraph output also but i dont know about Xgraph....please help me....
I have a small pdf file reagarding that. I think it can be helpful and by the way,me too doing a project in ns2.
ReplyDeletehello
ReplyDeletemy problem is comment trace utilization in ns2
or trace throughput vs number please help me
Hi i am working in ns2 for performance comparison of manet routing protocol like aodv and dsr ,I get the result in nam ,but don't know how to plot routing overhead ,pdf,end to end delay etc using xgraph ,please guide me
ReplyDeletehello i m minakshi. i m doing my project in sensor networks with ns-2.34 simulater while running my tcl script i m getting an error i.e.
ReplyDeletenum_node is 27
wrong node routing agent
i m very thankful if u guide me please.
hello i m winsy. i m doing my project in sensor networks with ns-2.34 simulater while running my tcl script i m getting an error i.e.
ReplyDeletenum_node is 27
wrong node routing agent
i m very thankful if u guide me please.
send me the coding, iwll look into it.,
ReplyDelete