
Queuing in NS2 (RED Queue and SFQ)
HARDWARE / SOFTWARE REQUIRED:
- Network Simulator-2
- Operating System – LINUX (UBUNTU)
THEORY:
Queue Management is defined as the algorithm that manages the length of the packet queues by dropping packets when necessary. From the point of packet dropping, Queue management can be classified into 2 types
- Passive Queue Management: In Passive Queue Management the packet drop occurs only when the buffer gets full. Ex: Drop Tail.
- Active Queue Management: Active Queue Management employs preventive packet drops. It provides an implicit feedback mechanism to notify senders of the onset of congestion. Arriving packets are randomly dropped. Ex: RED.
Drop Tail: In this packets are dropped from the tail of the queue. Once the buffer gets full, all arriving packets are discarded. Packets already in the queue are not affected.
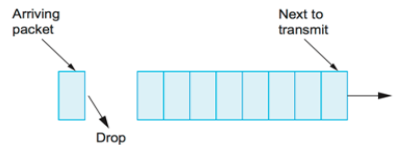
Figure 2.1: Drop Tail mechanism
As shown in figure 2.1, the arriving packet gets dropped from the tail when the queue is filled.
Random Early Detection: RED accepts all packets until the queue reaches minth, after which it drops a packet with a linear probability distribution function. When the queue length reaches maxth all packets are dropped with probability of one.
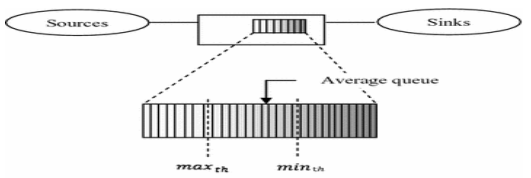
Figure 2.2: Random Early Detection:
Weighted random early detection (WRED)
It is a queuing discipline for a network scheduler suited for congestion avoidance. It is an extension to random early detection (RED) where a single queue may have several different sets of queue thresholds. Each threshold set is associated with a particular traffic class.
For example, a queue may have lower thresholds for lower-priority packets. A queue buildup will cause the lower-priority packets to be dropped, hence protecting the higher-priority packets in the same queue. In this way, quality of service prioritization is made possible for important packets from a pool of packets using the same buffer.
It is more likely that standard traffic will be dropped instead of higher prioritized traffic.
WRED proceeds in this order when a packet arrives:
- Calculation of the average queue size.
- The arriving packet is queued immediately if the average queue size is below the minimum queue threshold.
- Depending on the packet drop probability the packet is either dropped or queued if the average queue size is between the minimum and maximum queue threshold.
- The packet is automatically dropped if the average queue size is greater than the maximum threshold.
Adaptive RED Queue Discipline:
The motivation for Adaptive RED is the same as self-configuring RED. Self-configuring RED tries to keep the average queue size with minimum and maximum threshold values. But Sally Floyd says that why don’t keep the average queue size in a tight range just in the center of minimum and maximum threshold values. Also, Adaptive RED removes the kns and automatically sets them. Maximum drop probability is adapted based on the network availability, it is no longer a knob just like previous versions of RED.
Main contributions to Adaptive RED
- Automatic setting of minimum threshold (minth). It is set as a function of the link capacity (C) and target queue delay.
- Automatic setting of maximum threshold (maxth). It is set depending on the value of minth.
- Automatic setting of wq. It is set as a function of the link capacity (C).
- The adaptive setting of maxp. It is adapted according to the current average queue length.
ALGORITHM:
1. Create a simulator object
2. Define different colors for different data flows
3. Open a nam and trace file (output files)
4. Create 8 nodes that form a network numbered from 0 to 7 for the RED queue mechanism and 6 nodes that form a network numbered from 0 to 5 for the Drop tail mechanism.
5. Create duplex links between the nodes with a bandwidth of 100 Mbps.
6. Create duplex links between n3 and n4 with a bandwidth of 2Mbps for the RED queue mechanism and create duplex links between n2 and n3 with a bandwidth of 1Mbps for the Drop tail.
7. Set up TCP Connection between n0 and n5 and also set up UDP connection between n1 and n4 in case of Drop tail. In the case of the RED queue mechanism, set the TCP connection between n0 and n5 , the TCP connection between n2 and n7, and also set up the UDP connection between n1 and n6
8. Apply CBR Traffic over UDP, and FTP Traffic over TCP.
9. Define the finish procedure then close the trace file, and execute the nam file.
10. Schedule events and run the program
PROGRAM:
(a) RED queue mechanism.
#===================================
# Simulation parameters setup
#===================================
set val(stop) 10.0 ;# time of simulation end
#===================================
# Initialization
#===================================
#Create a ns simulator
set ns [new Simulator]
#Open the NS trace file
set tracefile [open queue_red.tr w]
$ns trace-all $tracefile
#Open the NAM trace file
set namfile [open queue_red.nam w]
$ns namtrace-all $namfile
#===================================
# Nodes Definition
#===================================
#Create 7 nodes
set n0 [$ns node]
set n1 [$ns node]
set n2 [$ns node]
set n3 [$ns node]
set n4 [$ns node]
set n5 [$ns node]
set n6 [$ns node]
#===================================
# Links Definition
#===================================
# Create links between nodes
$ns duplex-link $n0 $n3 100.0Mb 10ms RED
$ns queue-limit $n0 $n3 50
$ns duplex-link $n4 $n1 100.0Mb 10ms RED
$ns queue-limit $n4 $n1 50
$ns duplex-link $n6 $n5 100.0Mb 10ms RED
$ns queue-limit $n6 $n5 50
$ns duplex-link $n4 $n6 100.0Mb 10ms RED
$ns queue-limit $n4 $n6 50
$ns duplex-link $n5 $n2 100.0Mb 10ms RED
$ns queue-limit $n5 $n2 50
$ns duplex-link $n0 $n2 100.0Mb 10ms RED
$ns queue-limit $n0 $n2 50
$ns duplex-link $n2 $n1 100.0Mb 10ms RED
$ns queue-limit $n2 $n1 50
$ns duplex-link $n1 $n5 100.0Mb 10ms RED
$ns queue-limit $n1 $n5 50
$ns duplex-link $n3 $n4 100.0Mb 10ms RED
$ns queue-limit $n3 $n4 50
$ns duplex-link $n3 $n1 100.0Mb 10ms RED
$ns queue-limit $n3 $n1 50
#Give node position (for NAM)
$ns duplex-link-op $n0 $n3 orient right-up
$ns duplex-link-op $n4 $n1 orient left-down
$ns duplex-link-op $n6 $n5 orient left-down
$ns duplex-link-op $n4 $n6 orient right-down
$ns duplex-link-op $n5 $n2 orient left
$ns duplex-link-op $n0 $n2 orient right-down
$ns duplex-link-op $n2 $n1 orient right-up
$ns duplex-link-op $n1 $n5 orient right-down
$ns duplex-link-op $n3 $n4 orient right
$ns duplex-link-op $n3 $n1 orient right-down
#===================================
# Agents Definition
#===================================
#Setup a TCP connection
set tcp0 [new Agent/TCP]
$ns attach-agent $n0 $tcp0
set sink2 [new Agent/TCPSink]
$ns attach-agent $n4 $sink2
$ns connect $tcp0 $sink2
$tcp0 set packetSize_ 1500
#Setup a TCP/FullTcp/Tahoe connection
set tcp1 [new Agent/TCP]
$ns attach-agent $n2 $tcp1
set sink3 [new Agent/TCPSink]
$ns attach-agent $n6 $sink3
$ns connect $tcp1 $sink3
$tcp1 set packetSize_ 1500
#===================================
# Applications Definition
#===================================
#Setup a FTP Application over TCP connection
set ftp0 [new Application/FTP]
$ftp0 attach-agent $tcp0
$ns at 1.0 "$ftp0 start"
$ns at 10.0 "$ftp0 stop"
#Setup a FTP Application over TCP/FullTcp/Tahoe connection
set ftp1 [new Application/FTP]
$ftp1 attach-agent $tcp1
$ns at 1.0 "$ftp1 start"
$ns at 10.0 "$ftp1 stop"
#===================================
# Termination
#===================================
#Define a 'finish' procedure
proc finish {} {
global ns tracefile namfile
$ns flush-trace
close $tracefile
close $namfile
exec nam queue_red.nam &
exit 0
}
$ns at $val(stop) "$ns nam-end-wireless $val(stop)"
$ns at $val(stop) "finish"
$ns at $val(stop) "puts \"done\" ; $ns halt"
$ns run
OUTPUT

RED Queue in ns2
SF queue mechanism
#===================================
# This script is created by NSG2 beta1
# <http://wushoupong.googlepages.com/nsg>
#===================================
# Simulation parameters setup
#===================================
setval(stop) 10.5 ;# time of simulation end
#===================================
# Initialization
#===================================
#Create a ns simulator
set ns [new Simulator]
#Open the NS trace file
set tracefile [open sfq.tr w]
$ns trace-all $tracefile
#Open the NAM trace file
set namfile [open sfq.nam w]
$ns namtrace-all $namfile
#===================================
# Nodes Definition
#===================================
#Create 6 nodes
set n0 [$ns node]
set n1 [$ns node]
set n2 [$ns node]
set n3 [$ns node]
set n4 [$ns node]
set n5 [$ns node]
#===================================
# Links Definition
#===================================
#Createlinks between nodes
$ns duplex-link $n0 $n2 100.0Mb 10ms SFQ
$ns queue-limit $n0 $n2 50
$ns duplex-link $n3 $n2 100.0Mb 10ms SFQ
$ns queue-limit $n3 $n2 50
$ns duplex-link $n1 $n2 100.0Mb 10ms SFQ
$ns queue-limit $n1 $n2 50
$ns duplex-link $n3 $n4 100.0Mb 10ms SFQ
$ns queue-limit $n3 $n4 50
$ns duplex-link $n3 $n5 100.0Mb 10ms SFQ
$ns queue-limit $n3 $n5 50
#Give node position (for NAM)
$ns duplex-link-op $n0 $n2 orient right-down
$ns duplex-link-op $n3 $n2 orient left
$ns duplex-link-op $n1 $n2 orient right-up
$ns duplex-link-op $n3 $n4 orient right-up
$ns duplex-link-op $n3 $n5 orient right-down
#===================================
# Agents Definition
#===================================
#Setup a TCP connection
set tcp0 [new Agent/TCP]
$ns attach-agent $n0 $tcp0
set sink3 [new Agent/TCPSink]
$ns attach-agent $n5 $sink3
$ns connect $tcp0 $sink3
$tcp0 set packetSize_ 1500
#Setup a TCP connection
set tcp1 [new Agent/TCP]
$ns attach-agent $n4 $tcp1
set sink2 [new Agent/TCPSink]
$ns attach-agent $n1 $sink2
$ns connect $tcp1 $sink2
$tcp1 set packetSize_ 1500
#===================================
# Applications Definition
#===================================
#Setup an FTP Application over a TCP connection
set ftp0 [new Application/FTP]
$ftp0 attach-agent $tcp0
$ns at 1.0 "$ftp0 start"
$ns at 10.0 "$ftp0 stop"
#Setup an FTP Application over a TCP connection
set ftp1 [new Application/FTP]
$ftp1 attach-agent $tcp1
$ns at 1.0 "$ftp1 start"
$ns at 10.0 "$ftp1 stop"
#===================================
# Termination
#===================================
#Define a 'finish' procedure
proc finish {} {
global ns tracefilenamfile
$ns flush-trace
close $tracefile
close $namfile
exec nam sfq.nam &
exit 0
}
$ns at $val(stop) "$ns nam-end-wireless $val(stop)"
$ns at $val(stop) "finish"
$ns at $val(stop) "puts \"done\" ; $ns halt"
$ns run
NAM OUTPUT

AWK OUTPUT

Nam and AWK output files
Comments
Post a Comment