
TELNET and FTP for a Wired Network
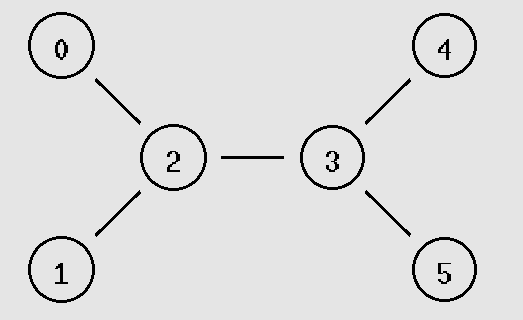
In the above network, Node 0 to Node 5 is enabled with Telnet Application, and Node 4 to Node 1 is enabled with FTP Application.
Both FTP and TElnet are application layer protocols use TCP as the transport Layer.
Requisites:
OS: Ubuntu 22.04
NS Version: 2.35
Results: Throughput with the help of AWK script
Animation: NAM
Graphs: xgraph or gnuplot
PROGRAM
#===================================
# Simulation parameters setup
#===================================
set val(stop) 10.5 ;# time of simulation end
#===================================
# Initialization
#===================================
#Create a ns simulator
set ns [new Simulator]
#Open the NS trace file
set tracefile [open telnet.tr w]
$ns trace-all $tracefile
#Open the NAM trace file
set namfile [open telnet.nam w]
$ns namtrace-all $namfile
#===================================
# Nodes Definition
#===================================
#Create 6 nodes
set n0 [$ns node]
set n1 [$ns node]
set n2 [$ns node]
set n3 [$ns node]
set n4 [$ns node]
set n5 [$ns node]
#===================================
# Links Definition
#===================================
#Create links between nodes
$ns duplex-link $n0 $n2 100.0Mb 10ms RED
$ns queue-limit $n0 $n2 50
$ns duplex-link $n3 $n2 100.0Mb 10ms RED
$ns queue-limit $n3 $n2 50
$ns duplex-link $n1 $n2 100.0Mb 10ms RED
$ns queue-limit $n1 $n2 50
$ns duplex-link $n3 $n4 100.0Mb 10ms RED
$ns queue-limit $n3 $n4 50
$ns duplex-link $n3 $n5 100.0Mb 10ms RED
$ns queue-limit $n3 $n5 50
#Give node position (for NAM)
$ns duplex-link-op $n0 $n2 orient right-down
$ns duplex-link-op $n3 $n2 orient left
$ns duplex-link-op $n1 $n2 orient right-up
$ns duplex-link-op $n3 $n4 orient right-up
$ns duplex-link-op $n3 $n5 orient right-down
#===================================
# Agents Definition
#===================================
#Setup a TCP connection
set tcp0 [new Agent/TCP]
$ns attach-agent $n0 $tcp0
set sink3 [new Agent/TCPSink]
$ns attach-agent $n5 $sink3
$ns connect $tcp0 $sink3
$tcp0 set packetSize_ 1500
#Setup a TCP connection
set tcp1 [new Agent/TCP]
$ns attach-agent $n4 $tcp1
set sink2 [new Agent/TCPSink]
$ns attach-agent $n1 $sink2
$ns connect $tcp1 $sink2
$tcp1 set packetSize_ 1500
#===================================
# Applications Definition
#===================================
#Setup a TELNET Application over TCP connection
set telnet0 [new Application/Telnet]
$telnet0 attach-agent $tcp0
$ns at 1.0 "$telnet0 start"
$ns at 10.0 "$telnet0 stop"
$telnet0 set interval_ 0.002
$telnet0 set type_ Telnet
#Setup an FTP Application over a TCP connection
set ftp1 [new Application/FTP]
$ftp1 attach-agent $tcp1
$ns at 1.0 "$ftp1 start"
$ns at 10.0 "$ftp1 stop"
#===================================
# Termination
#===================================
#Define a 'finish' procedure
proc finish {} {
global ns tracefile namfile
$ns flush-trace
close $tracefile
close $namfile
exec nam telnet.nam &
exit 0
}
$ns at $val(stop) "$ns nam-end-wireless $val(stop)"
$ns at $val(stop) "finish"
$ns at $val(stop) "puts \"done\" ; $ns halt"
$ns run
When you run the above file using the command
$ ns telnet.tcl
The outputs generated are telnet.nam and telnet.tr
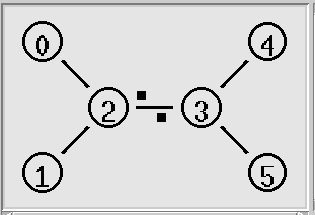
The packet transmission is shown like this in the animation window below
Output NAM File
 |
| Nam output |
Output Trace File
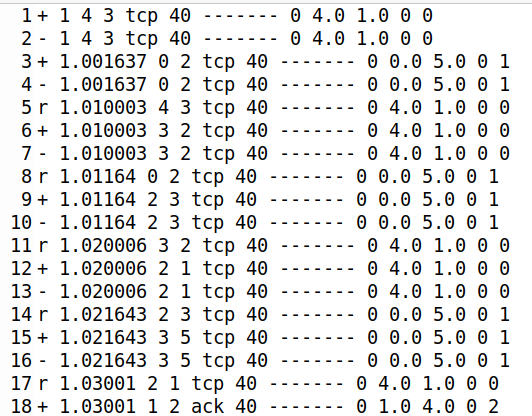 |
| Trace |
To get the throughput of the above file in bits per second, here is the awk script:
Save the following code in a file called throughput.awk and store in the same place where the tcl code is also stored.
BEGIN {
recv = 0
currTime = prevTime = 0
tic = 0.1
}
{
# Trace line format: normal
if ($2 != "-t") {
event = $1
time = $2
if (event == "+" || event == "-") node_id = $3
if (event == "r" || event == "d") node_id = $4
flow_id = $8
pkt_id = $12
pkt_size = $6
flow_t = $5
level = "AGT"
}
# Trace line format: new
if ($2 == "-t") {
event = $1
time = $3
node_id = $5
flow_id = $39
pkt_id = $41
pkt_size = $37
flow_t = $45
level = $19
}
# Init prevTime to the first packet recv time
if(prevTime == 0)
prevTime = time
# Calculate the total received packets' size
if (level == "AGT" && event == "r" ) {
# Store received packet's size
recv += pkt_size
# This 'if' is introduced to obtain clearer
# Plots from the output of this script
currTime += (time - prevTime)
if (currTime >= tic) {
printf("%15g %18g\n",time,(recv/currTime)*(8/1000))
recv = 0
currTime = 0
}
prevTime = time
}
}
END {
printf("\n\n")
}
The above file can be run using the command:
$ gawk -f throughput.awk out.tr
The above command will print the following which informs the throughput of using Telnet and FTP
AWK OUTPUT

The plotting of out.tr is looking like the following graph:
$ xgraph out.tr
 |
| Xgraph |
Gnuplot Output will be like this
$ gnuplot
gnuplot> plot "out.tr" using 1:2 with linespoints title "Throughput"
 |
| Gnuplot |
Dear Sir, I am watching your youtube videos on ACO on NS2, is there any option to apply it on NS3
ReplyDelete